-
Close
 Search

Newbie
49 posts
How I set up a basic development environment suitable for a single developer, but expandable to multiple developers using Docker, Adobe ColdFusion, Git, Docker, and BitBucket. Part 1 – Applying settings to ColdFusion
In Part 1 of this series, Software and File Structure, I laid out the goals of this project. I explained the use of Docker and the ColdFusion Docker images. In this article I will modify some settings in the ColdFusion Administrator, add some data, and make them persist through Docker builds.
Again, my obligatory preamble. I’m not a Docker expert. I did some research, and I took a couple of online courses, and I figured it out. There may be better or different ways to accomplish what I’ve accomplished.
If you followed the first part of this tutorial, you’ve got a docker-compose,yml file that is spinning up two containers; one for ColdFusion, and one for MS SQL Server, and the SQL Server is creating a database when the container is built. Great! But what about the datasource connection between these two? And what about populating the database with some data? In this part, I’ll discuss changes in the ColdFusion Administrator and how to persist those changes when the container is stopped and restarted.
Setting up the Data Source
The first thing I wanted to do is set up a data source to connect the ColdFusion server container with the MS SQL Server container. This is a pretty straightforward task. Taking a look at the docker-compose.yml that we created in Part I, you’ll notice that the ColdFusion docker service maps port 80 on the local machine to port 8500 in the docker container on line 30. You’ll also noticed that we established the (super-secure) password “C0ldFusi0n” on line 36. With this information in hand, accessing the ColdFusion Administrator is as easy as visiting http://127.0.0.1/CFIDE/Administrator in my browser, and entering the password.
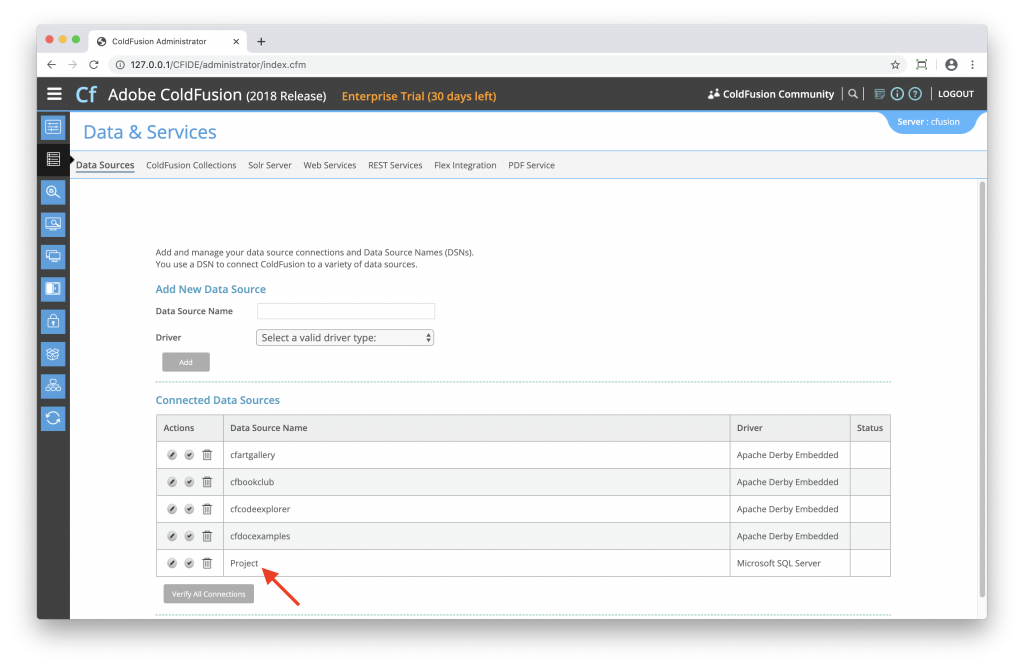
Once logged into the CF Administrator, I click on the “Data and Services” tab and go to the Data Sources page.
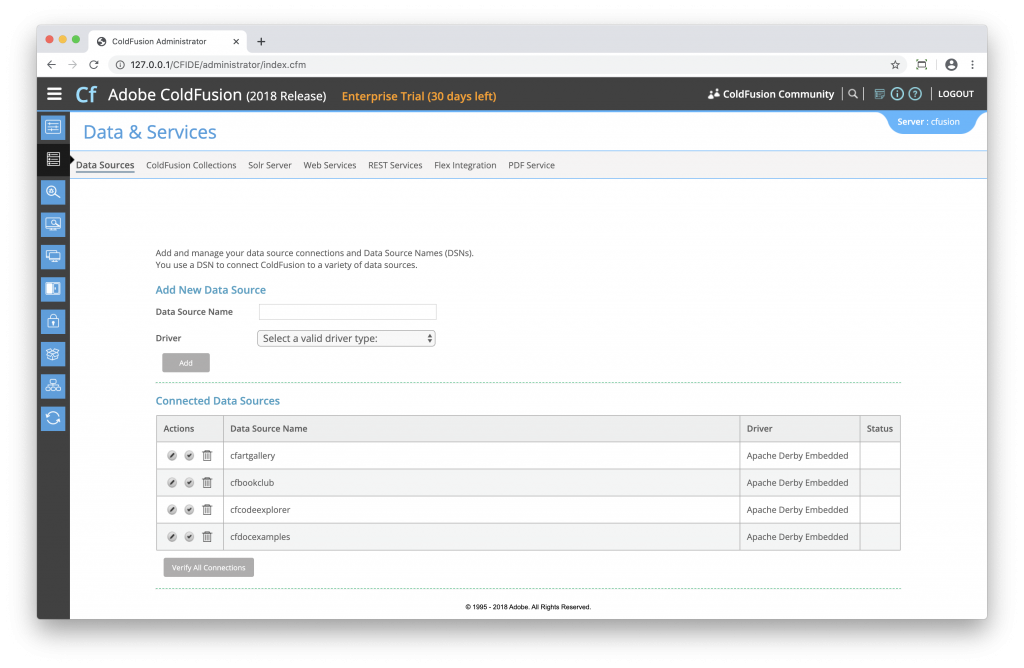
The CF Administrator Data Sources page running in my Docker container
This is great! Now I can add my Data Source to the SQL Server Container. I give the new data source a name of “Project,” select “Microsoft SQL Server” as the driver and click the Add button.
On the next page, I need to provide the information for the ColdFusion Administrator to connect to the Project database on my SQL Server container. In part I, in the docker-compose.yml file, we gave the SQL Server container a hostname of “sql” on line 6, and assigned port 1433 (the default SQL Server port) on the local machine to port 1433 on the SQL Server Docker container. We made sure that the SQL Server container and the ColdFusion container were on the same network. (Lines 7, 8, 27, 28, 46, and 47 for reference.). We also gave the SQL Server instance the super-secret password of “SQLS3rv3r” on line 16. With this information in hand, I plugged the following values into the Data Source creation screen:
CF Data Source Name: Project
Database: Project
Server: sql
Port: 1433
User name: sa
Password: SQLS3rv3r

Once this is done, I clicked Submit, and ColdFusion validated that the connection to the datasource worked. Exciting!
One Problem: ColdFusion Server Settings do not persist once the Docker instance terminates.
My ColdFusion Docker container now has a datasource to the SQL Server Docker container. But there’s a problem here, and I want to demonstrate it in a way that’s going to require me to set up this data source from scratch. I’m going to bring down my Docker containers by going to the terminal window in which they were running and pressing Command-C. (CTRL-C on a Windows machine.) When I started the containers, I did so by simply running this command in my terminal window:
docker-compose up
This meant that the terminal window itself was running the instances and terminating the task, or closing the terminal window meant that my Docker containers were no longer running. This time, I’m going to start up the containers in detached mode so that the containers are running independent of the terminal window. I execute the following command to spin the containers back up:
docker-compose up -d
The containers start, and I browse to the ColdFusion Administrator once again, and click on the data sources tab… but wait. My Project data source is now gone? That’s right. Docker instances are generally stateless, so once you make changes to the ColdFusion Administrator, you need to use a means to persist that data.
ColdFusion will automatically apply .car files in the /data directory
Fortunately, ColdFusion makes it easy! I recreate the Project data source by following the same steps I did last time… except this time, I’m going to create a ColdFusion Archive of the server settings. The ColdFusion Docker image is set to scan the /data folder at start up for any ColdFusion Archive (.car) files and apply them to the server. ColdFusion Archives are encrypted settings files that can be used to deploy server settings to a ColdFusion server. They’ve been around for a long time. (CFMX 6, I believe? Maybe even earlier?)
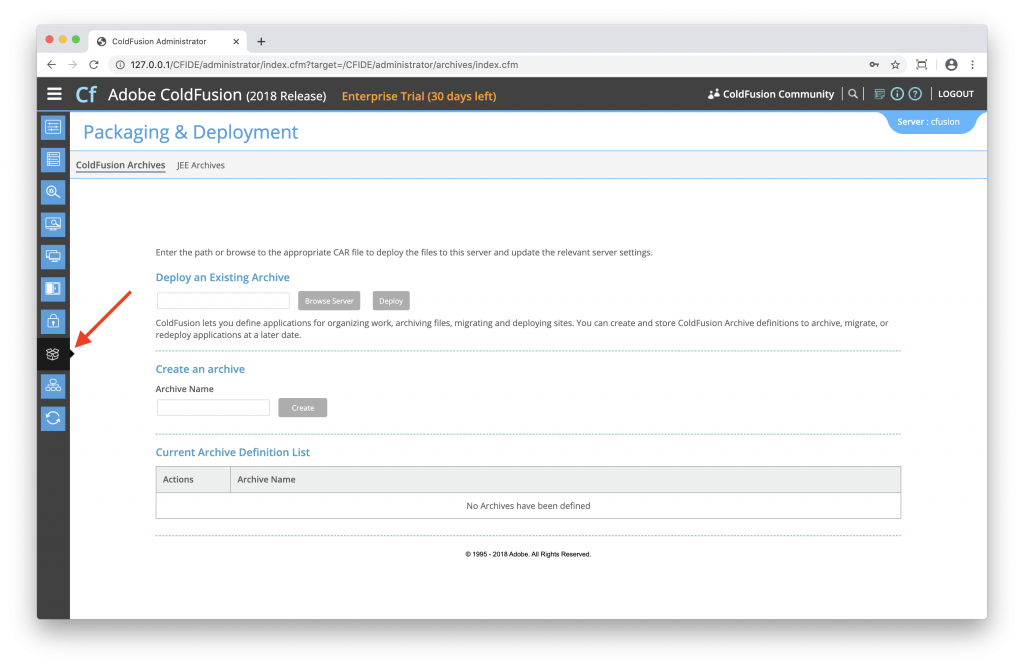
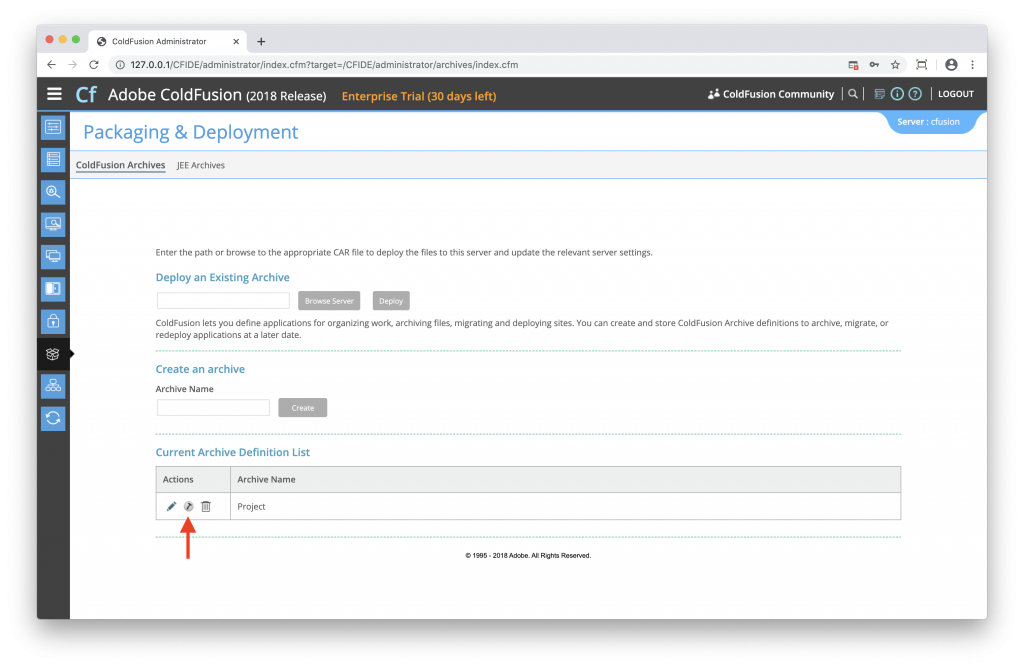
From the ColdFusion Administrator, I clicked on the tab titled “Packaging & Deployment” located here:
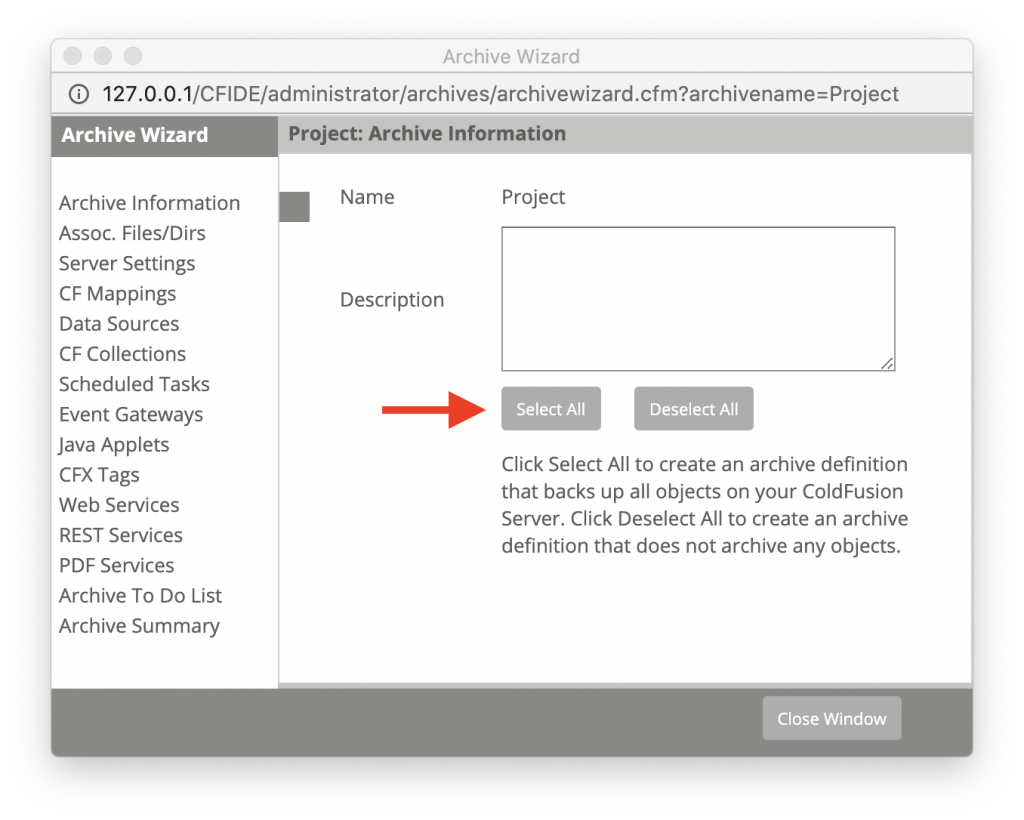
From this page, I will create an Archive. First thing’s first: make sure your pop-up blocker is disabled. I enter the Archive name “Project” and click create, which causes a pop-up of the archive settings. From the pop-up there’s two paths you can take.
Path 1: “Easy Mode”
The easiest way to create an archive is to select all of the settings at once by clicking the “Select All” button on the main settings page. This will select all of the available options in your ColdFusion Server instance and designate them for the archive.
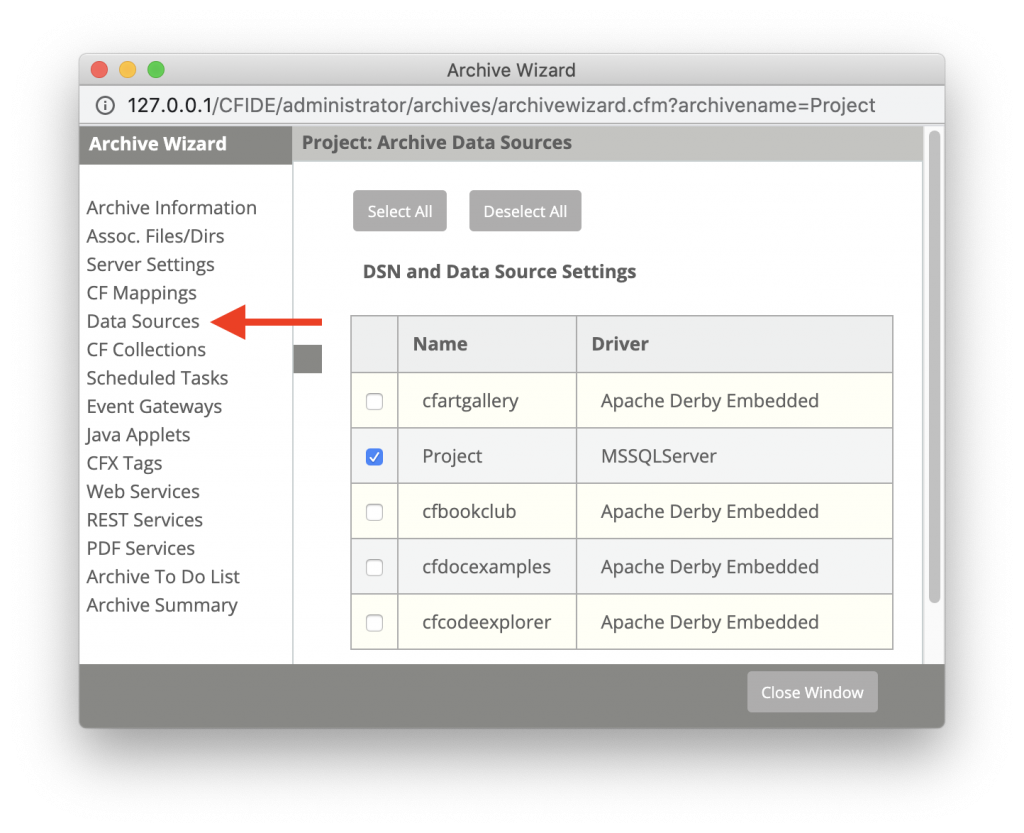
Path 2: Not “Easy Mode” but still pretty simple.
However, I like to take a more specific approach. I only changed one setting in my ColdFusion Administrator; I added a data source. So I’m going to use a scalpel, and designate only that data source for archival. I click on “Data Sources” on the left column, and choose only my “Project” data source.
Once I’ve selected what I need, I close the window. This is the first step; establishing the archive and telling ColdFusion what to put into it. The second step is just as straight forward; we need to build the archive. I close the window, which takes me back to the CF Administrator, Packaging & Deployment page. I click on the “Build” button located here:
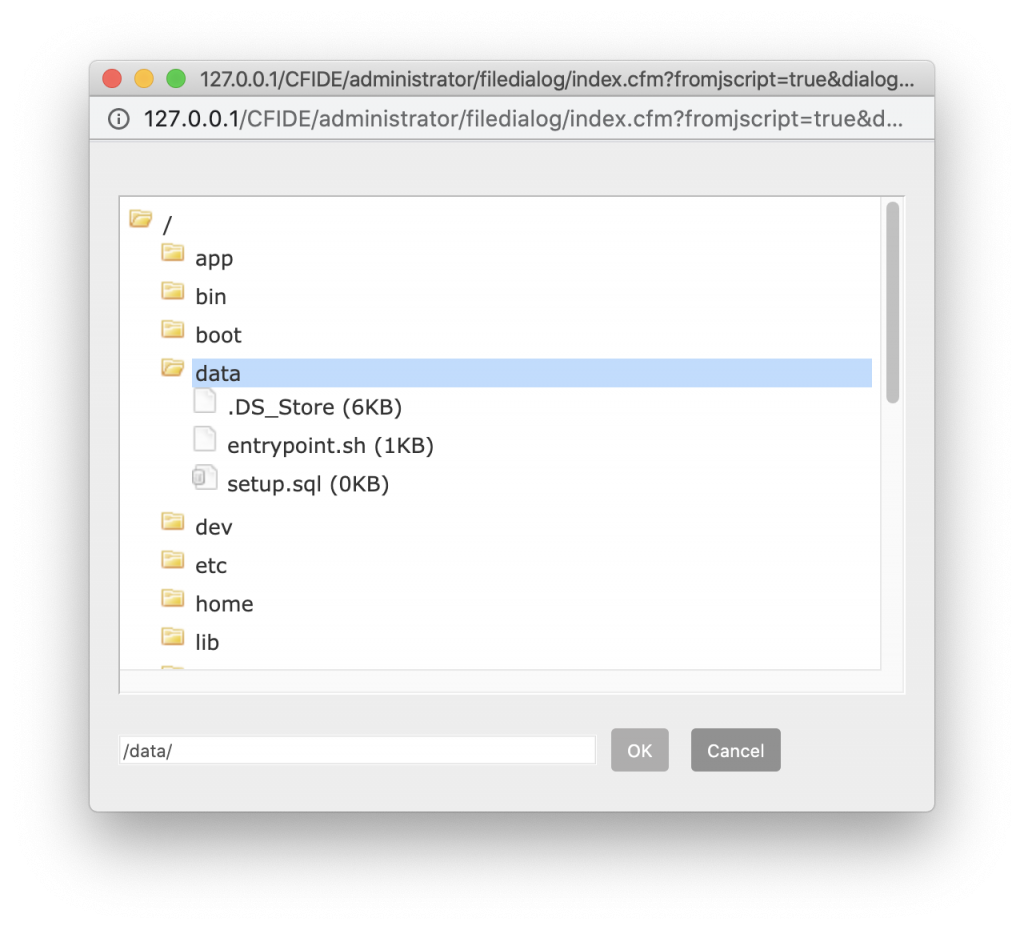
This brings up another pop-up with the archive summary one the first page. I click next. The second page defines where you want the archive to be stored. Clicking the “browse server” button brings up a tree structure of the ColdFusion container’s file system. Pay attention here because this is where things get important.
On line 33 of our docker-compose.yml file, we mapped the data folder in our project to the data folder on the container. I can see the data folder when I browse the server, and it contains the familiar entrypoint.sh and setup.sql files from my local file system that we created in Part I. You can see the results of this in the screenshot below:
I choose this folder as the destination of my ColdFusion Archive and append the name “Project.car” to the destination.
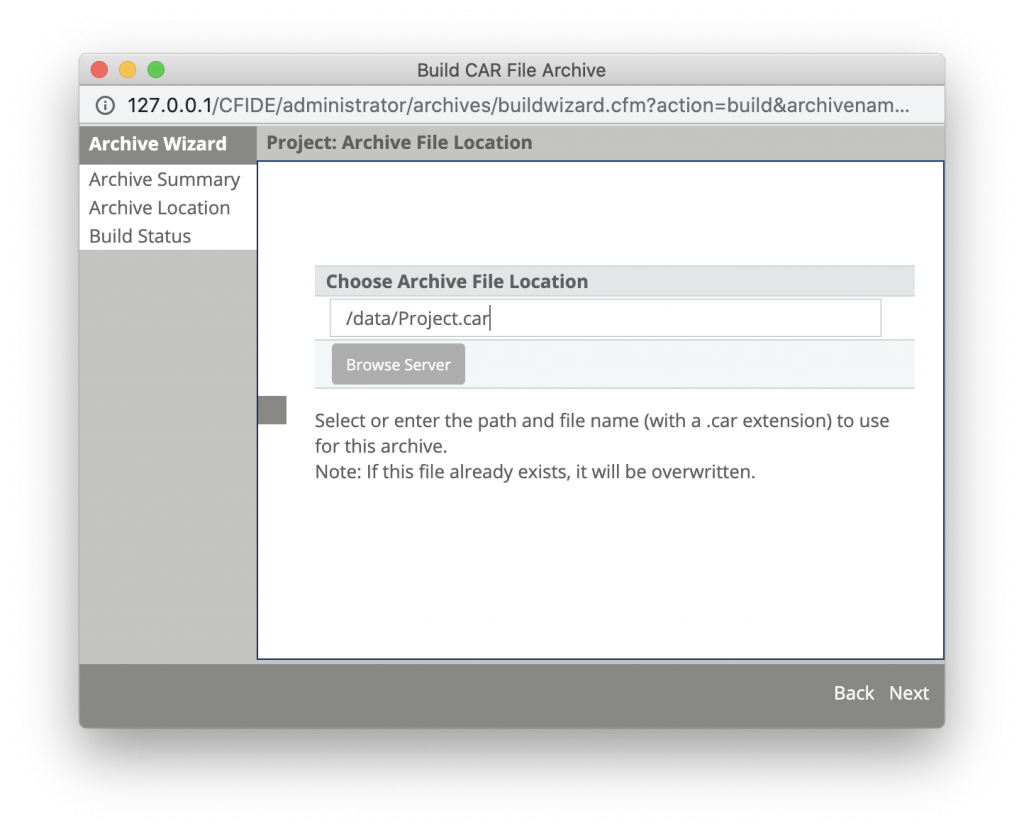
Once I click next, the ColdFusion Archive is built, and the Project.car file exists in my local file structure. Now, whenever I spin up the docker container, ColdFusion will automatically find this archive, apply its settings, and my data source will be in place, automatically!
Some “Gotcha’s”
There are a couple of (in my opinion, minor) caveats to this approach.
- When the ColdFusion Server applies a ColdFusion Archive file, the ColdFusion Service must be restarted in order for the settings to take effect. This means your Docker container will end up loading ColdFusion, finding the settings, applying the settings, and restarting the ColdFusion service. This will add to the startup time of your container.
- Whenever you make a change to any ColdFusion server settings, you need to rebuild the archive, or the settings will be lost once you terminate the container.
Final Testing
I believe I have a solution in place to persist settings like data sources in my ColdFusion container. It’s time to put it to the test. Since I’ve been running the instances in detached mode, I can go to my browser and execute the following command.
docker-compose down
Once the instances are shut down, I execute the following command to bring them back up.
docker-compose up -d
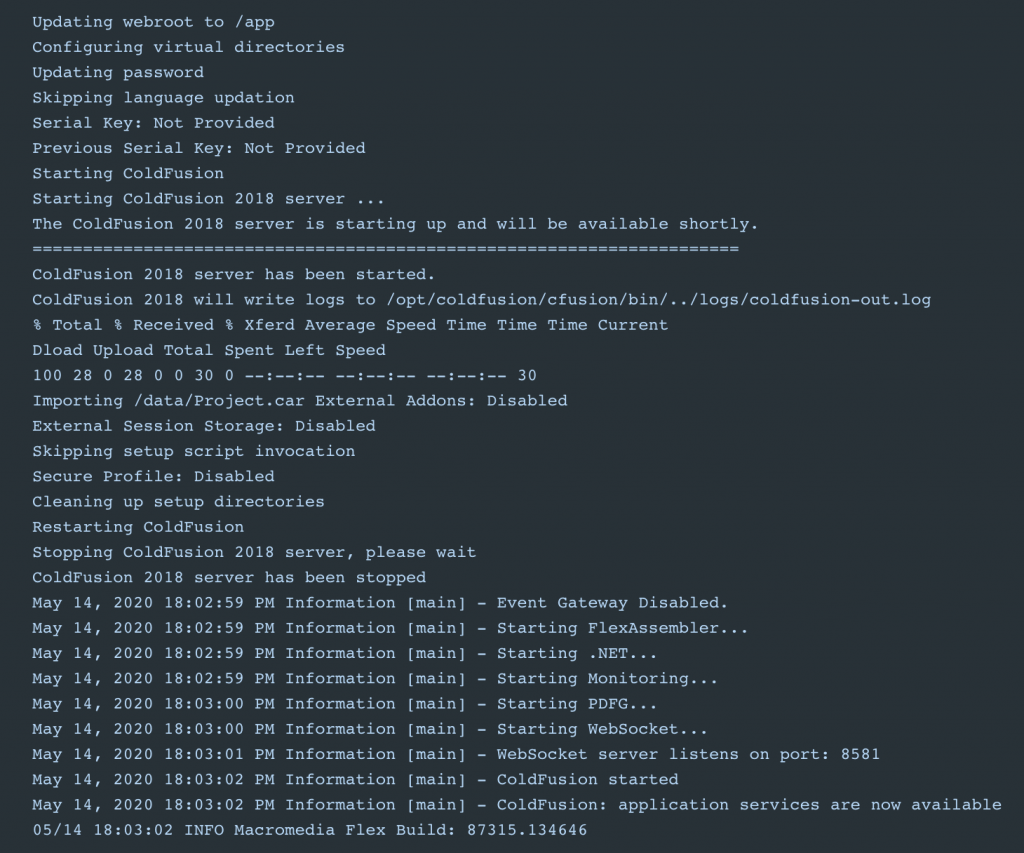
As the ColdFusion Server image is loading, I checked the logs from the Docker Dashboard. Looking at the logs, I can see that ColdFusion is loading, it’s finding the ColdFusion Archive, applying the settings, and restarting the service.
And, the last step… logging back into the ColdFusion Server and checking my data sources. I go to http://127.0.0.1/CFIDE/Administrator, log in and visit the data sources tab, and EUREKA!
We’re now persisting ColdFusion Server settings like a boss.
In the next article, I’ll do the same thing with SQL Server data, making it persist across instance runs. Enjoy!
In Part 1 of this series, Software and File Structure, I laid out the goals of this project. I explained the use of Docker and the ColdFusion Docker images. In this article I will modify some settings in the ColdFusion Administrator, add some data, and make them persist through Docker builds.
Again, my obligatory preamble. I’m not a Docker expert. I did some research, and I took a couple of online courses, and I figured it out. There may be better or different ways to accomplish what I’ve accomplished.
If you followed the first part of this tutorial, you’ve got a docker-compose,yml file that is spinning up two containers; one for ColdFusion, and one for MS SQL Server, and the SQL Server is creating a database when the container is built. Great! But what about the datasource connection between these two? And what about populating the database with some data? In this part, I’ll discuss changes in the ColdFusion Administrator and how to persist those changes when the container is stopped and restarted.
Setting up the Data Source
The first thing I wanted to do is set up a data source to connect the ColdFusion server container with the MS SQL Server container. This is a pretty straightforward task. Taking a look at the docker-compose.yml that we created in Part I, you’ll notice that the ColdFusion docker service maps port 80 on the local machine to port 8500 in the docker container on line 30. You’ll also noticed that we established the (super-secure) password “C0ldFusi0n” on line 36. With this information in hand, accessing the ColdFusion Administrator is as easy as visiting http://127.0.0.1/CFIDE/Administrator in my browser, and entering the password.
Once logged into the CF Administrator, I click on the “Data and Services” tab and go to the Data Sources page.
The CF Administrator Data Sources page running in my Docker container
This is great! Now I can add my Data Source to the SQL Server Container. I give the new data source a name of “Project,” select “Microsoft SQL Server” as the driver and click the Add button.
On the next page, I need to provide the information for the ColdFusion Administrator to connect to the Project database on my SQL Server container. In part I, in the docker-compose.yml file, we gave the SQL Server container a hostname of “sql” on line 6, and assigned port 1433 (the default SQL Server port) on the local machine to port 1433 on the SQL Server Docker container. We made sure that the SQL Server container and the ColdFusion container were on the same network. (Lines 7, 8, 27, 28, 46, and 47 for reference.). We also gave the SQL Server instance the super-secret password of “SQLS3rv3r” on line 16. With this information in hand, I plugged the following values into the Data Source creation screen:
CF Data Source Name: Project
Database: Project
Server: sql
Port: 1433
User name: sa
Password: SQLS3rv3r
Once this is done, I clicked Submit, and ColdFusion validated that the connection to the datasource worked. Exciting!
One Problem: ColdFusion Server Settings do not persist once the Docker instance terminates.
My ColdFusion Docker container now has a datasource to the SQL Server Docker container. But there’s a problem here, and I want to demonstrate it in a way that’s going to require me to set up this data source from scratch. I’m going to bring down my Docker containers by going to the terminal window in which they were running and pressing Command-C. (CTRL-C on a Windows machine.) When I started the containers, I did so by simply running this command in my terminal window:
docker-compose up
This meant that the terminal window itself was running the instances and terminating the task, or closing the terminal window meant that my Docker containers were no longer running. This time, I’m going to start up the containers in detached mode so that the containers are running independent of the terminal window. I execute the following command to spin the containers back up:
docker-compose up -d
The containers start, and I browse to the ColdFusion Administrator once again, and click on the data sources tab… but wait. My Project data source is now gone? That’s right. Docker instances are generally stateless, so once you make changes to the ColdFusion Administrator, you need to use a means to persist that data.
ColdFusion will automatically apply .car files in the /data directory
Fortunately, ColdFusion makes it easy! I recreate the Project data source by following the same steps I did last time… except this time, I’m going to create a ColdFusion Archive of the server settings. The ColdFusion Docker image is set to scan the /data folder at start up for any ColdFusion Archive (.car) files and apply them to the server. ColdFusion Archives are encrypted settings files that can be used to deploy server settings to a ColdFusion server. They’ve been around for a long time. (CFMX 6, I believe? Maybe even earlier?)
From the ColdFusion Administrator, I clicked on the tab titled “Packaging & Deployment” located here:
From this page, I will create an Archive. First thing’s first: make sure your pop-up blocker is disabled. I enter the Archive name “Project” and click create, which causes a pop-up of the archive settings. From the pop-up there’s two paths you can take.
Path 1: “Easy Mode”
The easiest way to create an archive is to select all of the settings at once by clicking the “Select All” button on the main settings page. This will select all of the available options in your ColdFusion Server instance and designate them for the archive.
Path 2: Not “Easy Mode” but still pretty simple.
However, I like to take a more specific approach. I only changed one setting in my ColdFusion Administrator; I added a data source. So I’m going to use a scalpel, and designate only that data source for archival. I click on “Data Sources” on the left column, and choose only my “Project” data source.
Once I’ve selected what I need, I close the window. This is the first step; establishing the archive and telling ColdFusion what to put into it. The second step is just as straight forward; we need to build the archive. I close the window, which takes me back to the CF Administrator, Packaging & Deployment page. I click on the “Build” button located here:
This brings up another pop-up with the archive summary one the first page. I click next. The second page defines where you want the archive to be stored. Clicking the “browse server” button brings up a tree structure of the ColdFusion container’s file system. Pay attention here because this is where things get important.
On line 33 of our docker-compose.yml file, we mapped the data folder in our project to the data folder on the container. I can see the data folder when I browse the server, and it contains the familiar entrypoint.sh and setup.sql files from my local file system that we created in Part I. You can see the results of this in the screenshot below:
I choose this folder as the destination of my ColdFusion Archive and append the name “Project.car” to the destination.
Once I click next, the ColdFusion Archive is built, and the Project.car file exists in my local file structure. Now, whenever I spin up the docker container, ColdFusion will automatically find this archive, apply its settings, and my data source will be in place, automatically!
Some “Gotcha’s”
There are a couple of (in my opinion, minor) caveats to this approach.
- When the ColdFusion Server applies a ColdFusion Archive file, the ColdFusion Service must be restarted in order for the settings to take effect. This means your Docker container will end up loading ColdFusion, finding the settings, applying the settings, and restarting the ColdFusion service. This will add to the startup time of your container.
- Whenever you make a change to any ColdFusion server settings, you need to rebuild the archive, or the settings will be lost once you terminate the container.
Final Testing
I believe I have a solution in place to persist settings like data sources in my ColdFusion container. It’s time to put it to the test. Since I’ve been running the instances in detached mode, I can go to my browser and execute the following command.
docker-compose down
Once the instances are shut down, I execute the following command to bring them back up.
docker-compose up -d
As the ColdFusion Server image is loading, I checked the logs from the Docker Dashboard. Looking at the logs, I can see that ColdFusion is loading, it’s finding the ColdFusion Archive, applying the settings, and restarting the service.
And, the last step… logging back into the ColdFusion Server and checking my data sources. I go to http://127.0.0.1/CFIDE/Administrator, log in and visit the data sources tab, and EUREKA!
We’re now persisting ColdFusion Server settings like a boss.
In the next article, I’ll do the same thing with SQL Server data, making it persist across instance runs. Enjoy!


You must be logged in to post a comment.
- Most Recent
- Most Relevant
Was Part 3 ever written? Was curious what other tips / tricks have came about for having a good and solid development environment and workflow using ColdFusion, MSSQL Server, Docker, and Git.
I never did finish Part 3 because… well… life got in the way. However, I am working on an entirely new soup-to-nuts tutorial that involves local Docker containers with persistent data, using BitBucket as a code repository, and AWS CodeDeploy to push changes to that code to load-balanced AWS Servers… so look for that in the future.
I extended the base ACF image and installed Commandbox and am going to leverage CFConfig to restore my settings.