-
Close
 Search

Newbie
49 posts
In this article, I’ll walk through setting up an EC2 Server on AWS and installing Redis for ColdFusion 2018 to use as session storage.
I recently had an opportunity to work with a client who was scaling their resources. It was relatively minor… they had a single ColdFusion server and wanted to move to two. As part of this scaling project, they wanted to offload their session management to an external session storage. Luckily, ColdFusion 2018 natively supports external session storage through Redis.
Keep in mind, this client has a super simple set up for their ColdFusion application. They’ve got one SQL Server. They’ve got one ColdFusion Server. That’s it. They store sessions in memory. It’s as basic as it gets. Seriously. Here’s their existing setup.

Now… to some degree, I’m oversimplifying here. They use some other AWS Services (Elastic IP Addresses, AWS SES for emails and messaging, and S3 for storage of some large files,) but for the most part this is it. Also, let me be clear that being cloud based isn’t necessary either. The fact that their existing servers are on AWS has no bearing on the rest of this tutorial. If your company hosts servers in house, you can still pull this off seamlessly. As long as the two servers can connect, this will work.
Here’s what they want to move to.
![]()
Pretty, right? Two ColdFusion Servers, both of which connect to a back end database, and use an Ubuntu 18.04 server running Redis as their external session storage. Let’s get started!
Step 1 – Spin Up the Server
The first step is to spin up an Amazon EC2 instance running Ubuntu 18.04. If you have an existing AWS account this is pretty straight forward. If not, head over to Amazon Web Services and set up an account.
Once I was logged in, I searched for “EC2” under AWS Services. EC2 is the name of Amazon’s virtual servers in the cloud service.
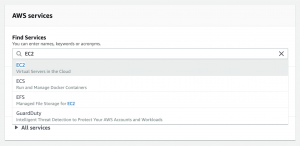
Next, I clicked on “Launch Instance” under the Create Instance header. It’s worth it to note that Amazon has many datacenter around the world. At the top of the page, there’s a drop down list with a choice of data centre locations. Choose one that seems reasonable for you. Since my client’s existing servers are in the AWS Oregon datacenter, I left that as the choice.
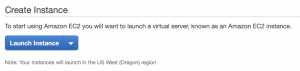
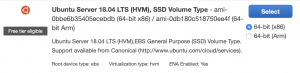
Next, I was given a list of AMI’s to choose from. I selected the Ubuntu 18.04 instance.
Next, I was given a list of instance types with different configurations. I needed to know how much power and memory the server needed. I know that Redis isn’t ridiculous when it comes to memory usage, but I wanted some more information. I found this on the Redis website:
- An empty instance uses ~ 3MB of memory.
- 1 Million small Keys -> String Value pairs use ~ 85MB of memory.
- 1 Million Keys -> Hash value, representing an object with 5 fields, use ~ 160 MB of memory.
The clients I was working for had an application that had moderate use. They weren’t going to have a million sessions… but they might have more than a thousand. They also stated that they had no problem signing on for a server for a long term commitment. Based on these things, and after a review of the AWS Reserved Instance pricing page, I selected a t3.small instance. 2 processors, 2 GB of RAM for (as of the time of this writing) $206 for a three year term.
At the bottom of this page, I clicked “Next: Configure Instance Details”. Note… they try to distract you with a big blue “Review and Launch” button, but I wanted to configure some more options before committing. On the next few pages I changed a limited number of options.
- I selected “protect against accidental termination” on the “Configure Instance Details” page.
- I bumped the hard drive size from 8 GB to 20 GB on the “Add Storage” page.
- I created a new security group on the “Configure Security Group” page called Redis and opened port 6379 to the server. This is the default port Redis uses for connections.
- I launched the instance, created an Elastic IP address and bound it to the instance.
The next step was to connect to the server using SSH. I use a Mac, so the Terminal found in Applications > Utilities > Terminal works perfectly for me. If you’re on a Windows computer and want to use PowerShell as your SSH client, check out this great article on How to Enable SSH in PowerShell. You will need to create a .pem file with an access key (if you don’t already have one) in order to connect to the server.
Step 2 – Install and Configure Redis
The first thing I like to do on a new server instance is make sure everything is up to date. I use the sudo -s command so that I don’t have to type sudo every line.
$ sudo -s
$ apt update
$ apt upgrade
Once these commands have been executed, your Ubuntu server will be up to date with the latest version of its packages. Ubuntu 18.04 includes Redis as one of it’s packages, so you don’t have to connect to any other repositories to install. This makes installation super simple.
$ apt install redis-server
This will download and install Redis and its dependencies. Next, we need to perform some configuration so modify the config file by executing the following:
$ nano /etc/redis/redis.conf
Next, search for the “supervised” attribute. This attribute allows you to declare an init system to manage Redis as a service, providing you with more control over its operation. It’s set to “no” by default, but we’re going to change that to “systemd” like so:
# If you run Redis from upstart or systemd, Redis can interact with your
# supervision tree. Options:
# supervised no - no supervision interaction
# supervised upstart - signal upstart by putting Redis into SIGSTOP mode
# supervised systemd - signal systemd by writing READY=1 to $NOTIFY_SOCKET
# supervised auto - detect upstart or systemd method based on
# UPSTART_JOB or NOTIFY_SOCKET environment variables
# Note: these supervision methods only signal "process is ready."
# They do not enable continuous liveness pings back to your supervisor.
supervised systemd
For my purposes, I wanted Redis to listen on all of the available network interfaces, so I commented out the line that read
bind 127.0.0.1 ::1
…by adding a pound sign to the beginning of the line. Next, I assigned a password to the server by modifying the line that reads:
# requirepass foobared
…to…
requirepass myRidiculousPasswordThatImNotGoingToPutInThisArticle
After restarting the service, my Redis instance was all set up and configured on the AWS Server. The third and final step is:
Step 3 – Configure ColdFusion 2018 to connect to your Redis instance
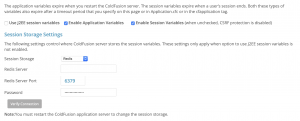
This part was insanely easy. I logged into the CF Administrator on each of the ColdFusion Servers and navigated to Server Settings > Memory Variables. I had to uncheck the “Use J2EE Session Variables” checkbox since these are invalid with an external session storage setup, but otherwise, it was just a matter of selecting “Redis” as the session storage, applying the IP address of the Redis server, setting 6379 as the port and providing the password.
I verified the connection, restarted the ColdFusion Server service and bingo-bango… external session storage was up and running! We tested by dropping connections on one server or another back and forth and checking to see if the session information was still available and it just worked beautifully.
In conclusion, you can have ColdFusion 2018 store sessions in an external session storage very easily! There’s more information in this Digital Ocean article that gives a lot more information about testing and configuring Redis as well as a lockdown guide.
Enjoy!
I recently had an opportunity to work with a client who was scaling their resources. It was relatively minor… they had a single ColdFusion server and wanted to move to two. As part of this scaling project, they wanted to offload their session management to an external session storage. Luckily, ColdFusion 2018 natively supports external session storage through Redis.
Keep in mind, this client has a super simple set up for their ColdFusion application. They’ve got one SQL Server. They’ve got one ColdFusion Server. That’s it. They store sessions in memory. It’s as basic as it gets. Seriously. Here’s their existing setup.
Now… to some degree, I’m oversimplifying here. They use some other AWS Services (Elastic IP Addresses, AWS SES for emails and messaging, and S3 for storage of some large files,) but for the most part this is it. Also, let me be clear that being cloud based isn’t necessary either. The fact that their existing servers are on AWS has no bearing on the rest of this tutorial. If your company hosts servers in house, you can still pull this off seamlessly. As long as the two servers can connect, this will work.
Here’s what they want to move to.
![]()
Pretty, right? Two ColdFusion Servers, both of which connect to a back end database, and use an Ubuntu 18.04 server running Redis as their external session storage. Let’s get started!
Step 1 – Spin Up the Server
The first step is to spin up an Amazon EC2 instance running Ubuntu 18.04. If you have an existing AWS account this is pretty straight forward. If not, head over to Amazon Web Services and set up an account.
Once I was logged in, I searched for “EC2” under AWS Services. EC2 is the name of Amazon’s virtual servers in the cloud service.
Next, I clicked on “Launch Instance” under the Create Instance header. It’s worth it to note that Amazon has many datacenter around the world. At the top of the page, there’s a drop down list with a choice of data centre locations. Choose one that seems reasonable for you. Since my client’s existing servers are in the AWS Oregon datacenter, I left that as the choice.
Next, I was given a list of AMI’s to choose from. I selected the Ubuntu 18.04 instance.
Next, I was given a list of instance types with different configurations. I needed to know how much power and memory the server needed. I know that Redis isn’t ridiculous when it comes to memory usage, but I wanted some more information. I found this on the Redis website:
- An empty instance uses ~ 3MB of memory.
- 1 Million small Keys -> String Value pairs use ~ 85MB of memory.
- 1 Million Keys -> Hash value, representing an object with 5 fields, use ~ 160 MB of memory.
The clients I was working for had an application that had moderate use. They weren’t going to have a million sessions… but they might have more than a thousand. They also stated that they had no problem signing on for a server for a long term commitment. Based on these things, and after a review of the AWS Reserved Instance pricing page, I selected a t3.small instance. 2 processors, 2 GB of RAM for (as of the time of this writing) $206 for a three year term.
At the bottom of this page, I clicked “Next: Configure Instance Details”. Note… they try to distract you with a big blue “Review and Launch” button, but I wanted to configure some more options before committing. On the next few pages I changed a limited number of options.
- I selected “protect against accidental termination” on the “Configure Instance Details” page.
- I bumped the hard drive size from 8 GB to 20 GB on the “Add Storage” page.
- I created a new security group on the “Configure Security Group” page called Redis and opened port 6379 to the server. This is the default port Redis uses for connections.
- I launched the instance, created an Elastic IP address and bound it to the instance.
The next step was to connect to the server using SSH. I use a Mac, so the Terminal found in Applications > Utilities > Terminal works perfectly for me. If you’re on a Windows computer and want to use PowerShell as your SSH client, check out this great article on How to Enable SSH in PowerShell. You will need to create a .pem file with an access key (if you don’t already have one) in order to connect to the server.
Step 2 – Install and Configure Redis
The first thing I like to do on a new server instance is make sure everything is up to date. I use the sudo -s command so that I don’t have to type sudo every line.
$ sudo -s
$ apt update
$ apt upgrade
Once these commands have been executed, your Ubuntu server will be up to date with the latest version of its packages. Ubuntu 18.04 includes Redis as one of it’s packages, so you don’t have to connect to any other repositories to install. This makes installation super simple.
$ apt install redis-server
This will download and install Redis and its dependencies. Next, we need to perform some configuration so modify the config file by executing the following:
$ nano /etc/redis/redis.conf
Next, search for the “supervised” attribute. This attribute allows you to declare an init system to manage Redis as a service, providing you with more control over its operation. It’s set to “no” by default, but we’re going to change that to “systemd” like so:
# If you run Redis from upstart or systemd, Redis can interact with your
# supervision tree. Options:
# supervised no - no supervision interaction
# supervised upstart - signal upstart by putting Redis into SIGSTOP mode
# supervised systemd - signal systemd by writing READY=1 to $NOTIFY_SOCKET
# supervised auto - detect upstart or systemd method based on
# UPSTART_JOB or NOTIFY_SOCKET environment variables
# Note: these supervision methods only signal "process is ready."
# They do not enable continuous liveness pings back to your supervisor.
supervised systemd
For my purposes, I wanted Redis to listen on all of the available network interfaces, so I commented out the line that read
bind 127.0.0.1 ::1
…by adding a pound sign to the beginning of the line. Next, I assigned a password to the server by modifying the line that reads:
# requirepass foobared
…to…
requirepass myRidiculousPasswordThatImNotGoingToPutInThisArticle
After restarting the service, my Redis instance was all set up and configured on the AWS Server. The third and final step is:
Step 3 – Configure ColdFusion 2018 to connect to your Redis instance
This part was insanely easy. I logged into the CF Administrator on each of the ColdFusion Servers and navigated to Server Settings > Memory Variables. I had to uncheck the “Use J2EE Session Variables” checkbox since these are invalid with an external session storage setup, but otherwise, it was just a matter of selecting “Redis” as the session storage, applying the IP address of the Redis server, setting 6379 as the port and providing the password.
I verified the connection, restarted the ColdFusion Server service and bingo-bango… external session storage was up and running! We tested by dropping connections on one server or another back and forth and checking to see if the session information was still available and it just worked beautifully.
In conclusion, you can have ColdFusion 2018 store sessions in an external session storage very easily! There’s more information in this Digital Ocean article that gives a lot more information about testing and configuring Redis as well as a lockdown guide.
Enjoy!


You must be logged in to post a comment.
- Most Recent
- Most Relevant
Aaah, no worries, I’ve fixed it by updating the code to:
<cfset structclear(session)>
<cfset sessionInvalidate()>
Cheers,
Jon
I was just about to recommend that! You beat me to it.
Thanks for your article David. It’s an excellent guide and I’ve used to setup a test Ubuntu server exactly as you’ve described.
All is working well, however, I’ve noticed an issue when clearing the session variable (for logging out of an application).
Previously, I was able to do the following on a logout.cfm page:
<cflock timeout=10 scope=”session” type=”exclusive”>
<cfset structclear(session)>
</cflock>
and the session was cleared and the user is effectively logged out. This is no longer working with the session storage on Redis instead of in memory. It executes the code ok but is no longer clearing the session variables. Any idea why that would be or how to overcome it?